
Taking payments with your device and app


Start selling anywhere
Let’s go over all-things payments-related. Scroll on or use these quick links to jump to a specific topic:
• taking a payment
• adding products to the browser
• adding purchases on the app
• emailing receipts
• sending receipts later
• processing refunds
Taking a payment
Card and digital wallet payments
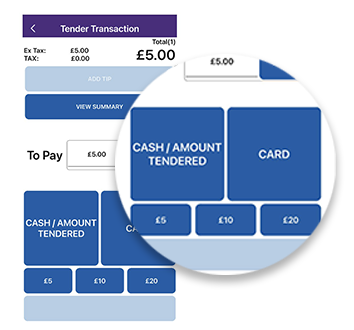
Simply tap the ‘Card’ button and present your device to the customer.
Cash payments
Press on the ‘Cash/Amount tendered’ button.
Quick tendering for cash
Use the quick tender buttons to save time – you can configure these in the portal.
For more on ways you can take payments, check out the set-up guide.
Adding products to the browser
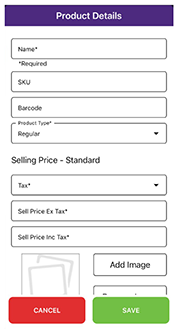
You can also add products to your browser screen for a quicker checkout.
1. Press the ‘Menu’ button in the top left-hand corner.
2. Select ‘Products’ from the list and press ‘New’.
3. Complete the form and tap ‘Save’.
4. When starting up a sale, add the selection of products and follow the on-screen instructions.
You can also add products to the browser via the portal. For more details, check out the set-up guide.
Adding purchases on the app
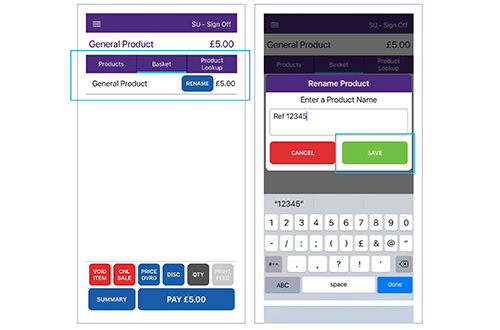
If you’ve already added products to the browser, simply make a selection and follow the on-screen instructions. Otherwise, you’ll need to select ‘General Product’ and add the amount charged.
1. Select ‘General Product’ and record the price.
2. Tap ‘Enter’.
3. When you get to the basket view, you can rename ‘General Product’ to something more unique, e.g. a customer account number. To do this, tap ‘Rename’, type in your new reference and press ‘Save’.
4. Click ‘Pay’ and select the customer’s payment type.
Emailing receipts
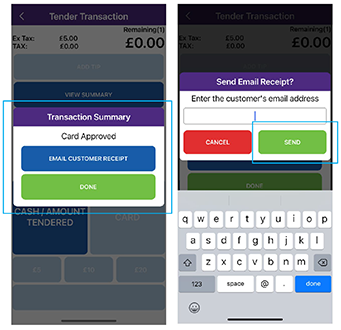
After accepting a payment, you’ll see a transaction summary screen on your app. You’ll have the option to email the customer a receipt or finish up the sale if they don’t want one.
If your customers want a receipt, tap the ‘Email customer receipt’ button and enter their email.
Then, press ‘Send’. They should receive their receipt instantly
Sending receipts later
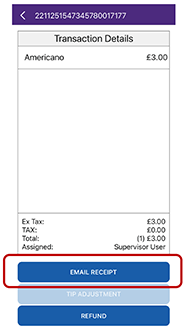
Receipts can be sent later by finding the transaction in the transaction history and selecting the email receipt option.
1. Access ‘Transaction History’ from the side menu.
2. Search for the transaction by date/time (or the transaction reference if you know it).
3. Select ‘View’ and then choose ‘Email receipt’.
4. Add email addresses and press ‘Send’.
Processing refunds
1. Select ‘Transaction History’ from the side menu.
2. Use the transaction reference from the receipt to ‘Lookup Transaction’ or select date to search.
3. Tap ‘View’ to see the transaction details and then ‘Refund’.
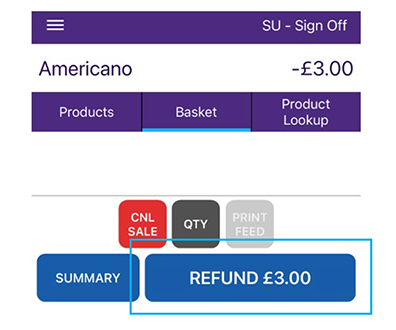
4. Choose ‘Full Refund’ or ‘Partial Refund’ when prompted. The refund will be added to the basket.
5. Check everything’s right and tap the ‘Refund’ button.
6. Select the payment method used in the original transaction.
Our team of experts are here to help
If you have any problems, our dedicated technical support team are here to help, whatever time or day – just call them on 0800 092 0808.
Is your Barclaycard payment solution still the right one for your business? If not, we’d be happy to talk you through our alternative products. Call us on 0800 161 5343, between Monday to Friday, 8am – 6pm. Or request a call-back and we'll ring you back within 3 working days.


